Back
Back
Share


Table of Contents
How to switch to the new Microsoft Outlook on Windows? Copilot Dictation Inking for Email Annotations Integration with Viva Engage Viva Insights Add-in Recall Message and Undo Send Show Declined Events on the Calendar Conditional Formatting Support Third-Party Email Accounts (Gmail, Yahoo, iCloud, and IMAP) Improved Hybrid Meeting Experience Tailor Outlook to your Style!
 Jul 2024
 8 Min Read
Top 10 Features in the New Microsoft Outlook to Boost Your Productivity
Microsoft has recently revamped its most essential productivity tool – Microsoft Outlook, unveiling a range of features and improvements that focus on enhancing collaboration, streamlining processes, boosting efficiency, and securing data in the era of digital communication. Ultimately, this is a bigger move towards addressing the rising demands of working professionals and revolutionizing connectivity and communication between them.
Right from the AI-driven Copilot feature to preserving declined events on the calendar to improved hybrid meeting experience to schedule send or snooze emails to email management and much more, the New Microsoft Outlook is packed with features and benefits galore. Moreover, in light of the growing cyber threats and attacks, the New Microsoft Outlook is built with robust security enhancements that elevate the confidentiality and integrity between users while safeguarding the system from unauthorized access and potential breaches.
How to switch to the new Microsoft Outlook on Windows?
Users of the New Outlook for Windows or Microsoft Outlook Desktop app can click the ‘Try the New Outlook’ toggle button in the upper-right corner of their Mail and Calendar of Microsoft Outlook or follow the on-screen instructions in the classic Outlook for Windows applications. After users toggle in, they can view their accounts migrated from classic Outlook for Windows to the New Outlook. Users can revert to the previous version of Outlook by toggling off the same button without loss of data or emails.
10 New Microsoft Outlook Features You Must Know
1. Copilot
Akin to its meaning, the Copilot feature in the new Outlook for Windows assists or relieves the users from the onus of drafting, improving, and summarizing emails, scheduling meetings, and organizing their daily workflow on a real-time basis. Powered by Artificial Intelligence and Machine Learning algorithms, Copilot is a virtual assistant that drafts and improves emails, especially Microsoft Outlook business emails with speed, personalization, accuracy, and relevance, thus outshining as the ultimate drafting and coaching partner. This not only saves time but facilitates clear and effective communication between multiple users.
Steps to Activate Copilot
- Click the File menu and select Options near the bottom left.
- Under Compose messages, tick the checkbox for Enable Microsoft 365 Copilot.
- If you can’t find the option directly, click the Editor Options button.
- In the Proofing tab, tick the checkbox for Use Copilot to help me write better emails and save the changes.
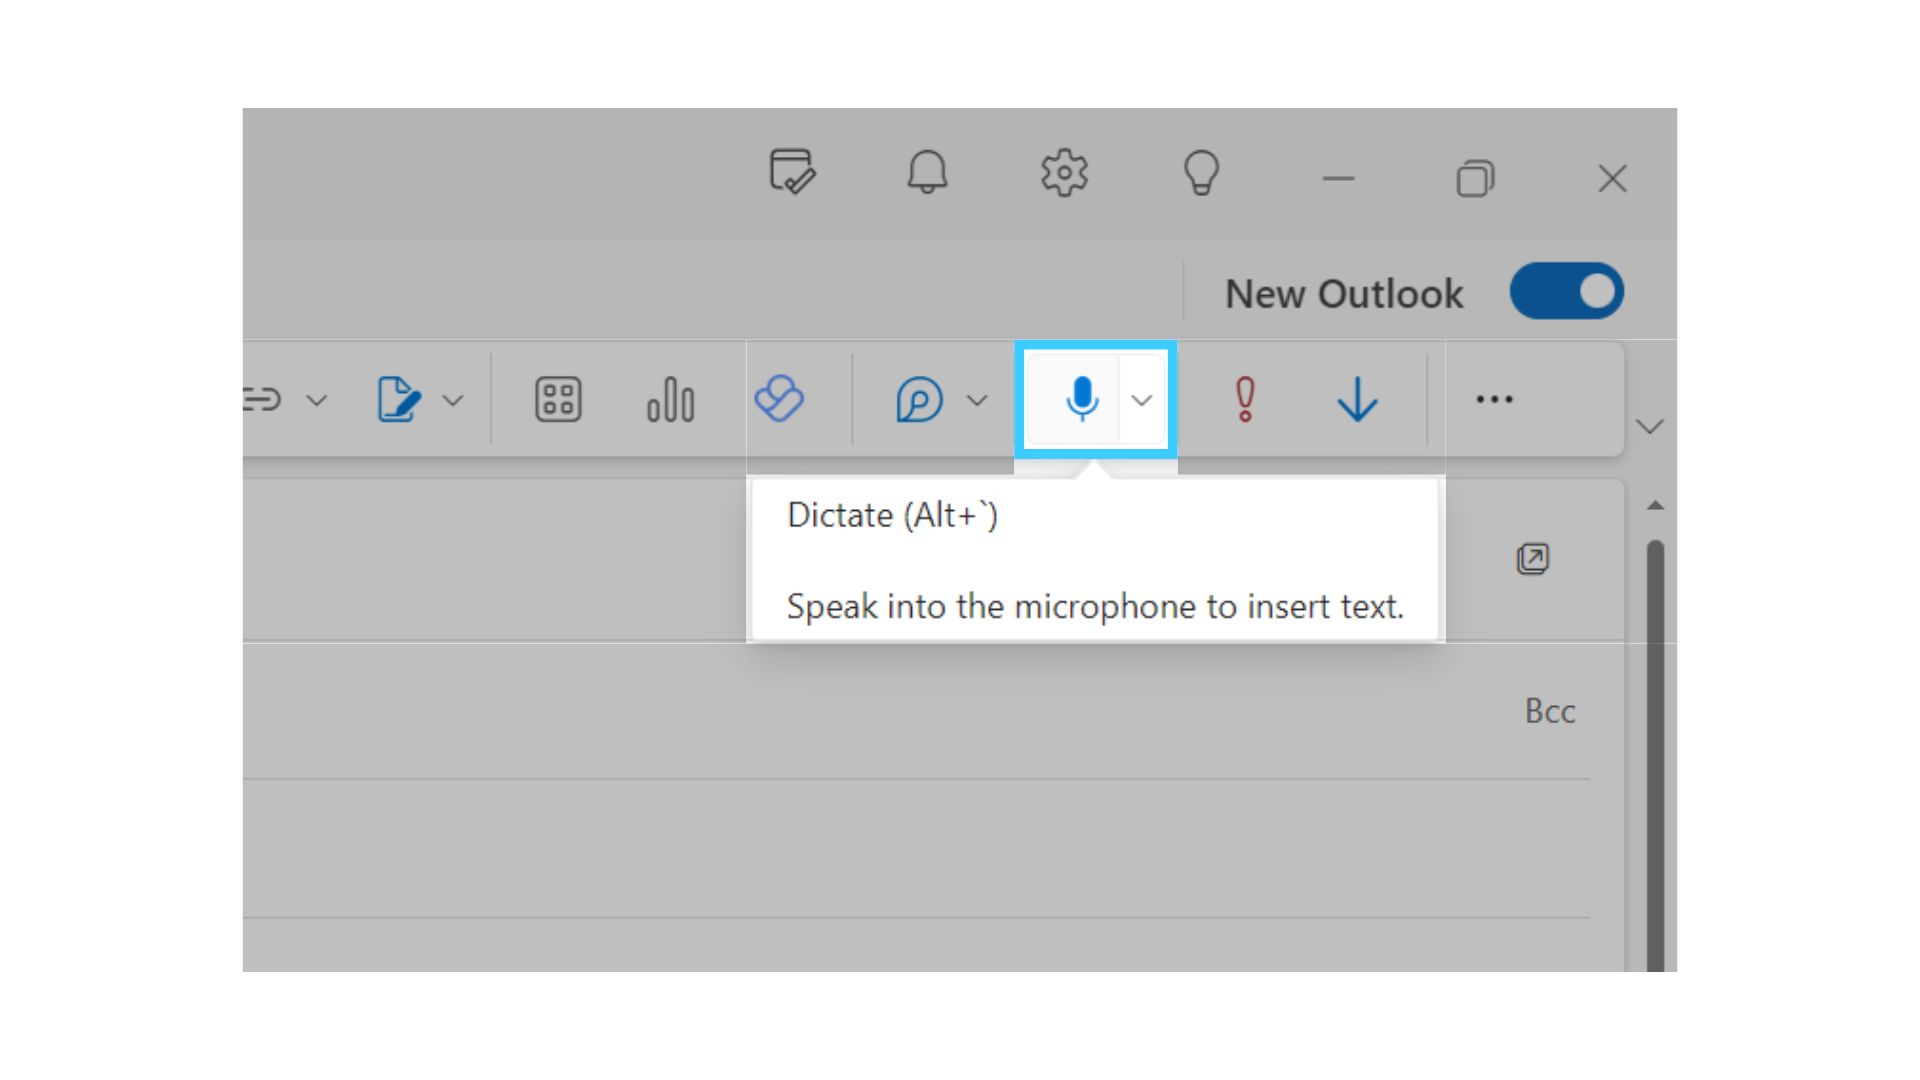
2. Dictation
Users can effortlessly create emails using the dictation feature in the New Microsoft Outlook for Windows. This feature allows the users to use the Microsoft Azure speech-to-text service to dictate emails with a microphone and reliable internet connection. This service supports a limited set of languages for now. In short, dictation is a quick and easy way to compose emails, send replies, and capture the tone of the user, thus enhancing accessibility and multitasking capabilities.
Steps to Activate Dictation
- Make sure the PC’s microphone is enabled before creating a new mail or replying to an existing mail.
- Click New Email or Reply and in the body of the message, click the Dictate (blue microphone icon) button, select the language, and wait for the beep which indicates that the microphone is ready to accept input.
- Start speaking to view the text on the screen.
- You can use commands like Full Stop, Comma, New Line, and New Paragraph while speaking to generate a readable message.
3. Inking for Email Annotations
The inking feature allows the users to add handwritten notes, sketches, annotations, and signatures to emails with their fingers, a digital pen, or mouse. All they need is a touch-enabled PC with a good pen to add a creative and personal touch to emails, thus highlighting specific points. Users with non-touch PCs can avail this feature using a mouse or touchpad.
Steps to Activate Inking
- If the user’s PC is touch-enabled, the Draw tab is turned on automatically. Otherwise, the user can turn it on by navigating through File > Options > Customize Ribbon > Draw.
- Click New Email or Reply to create a message and click on the Draw tab.
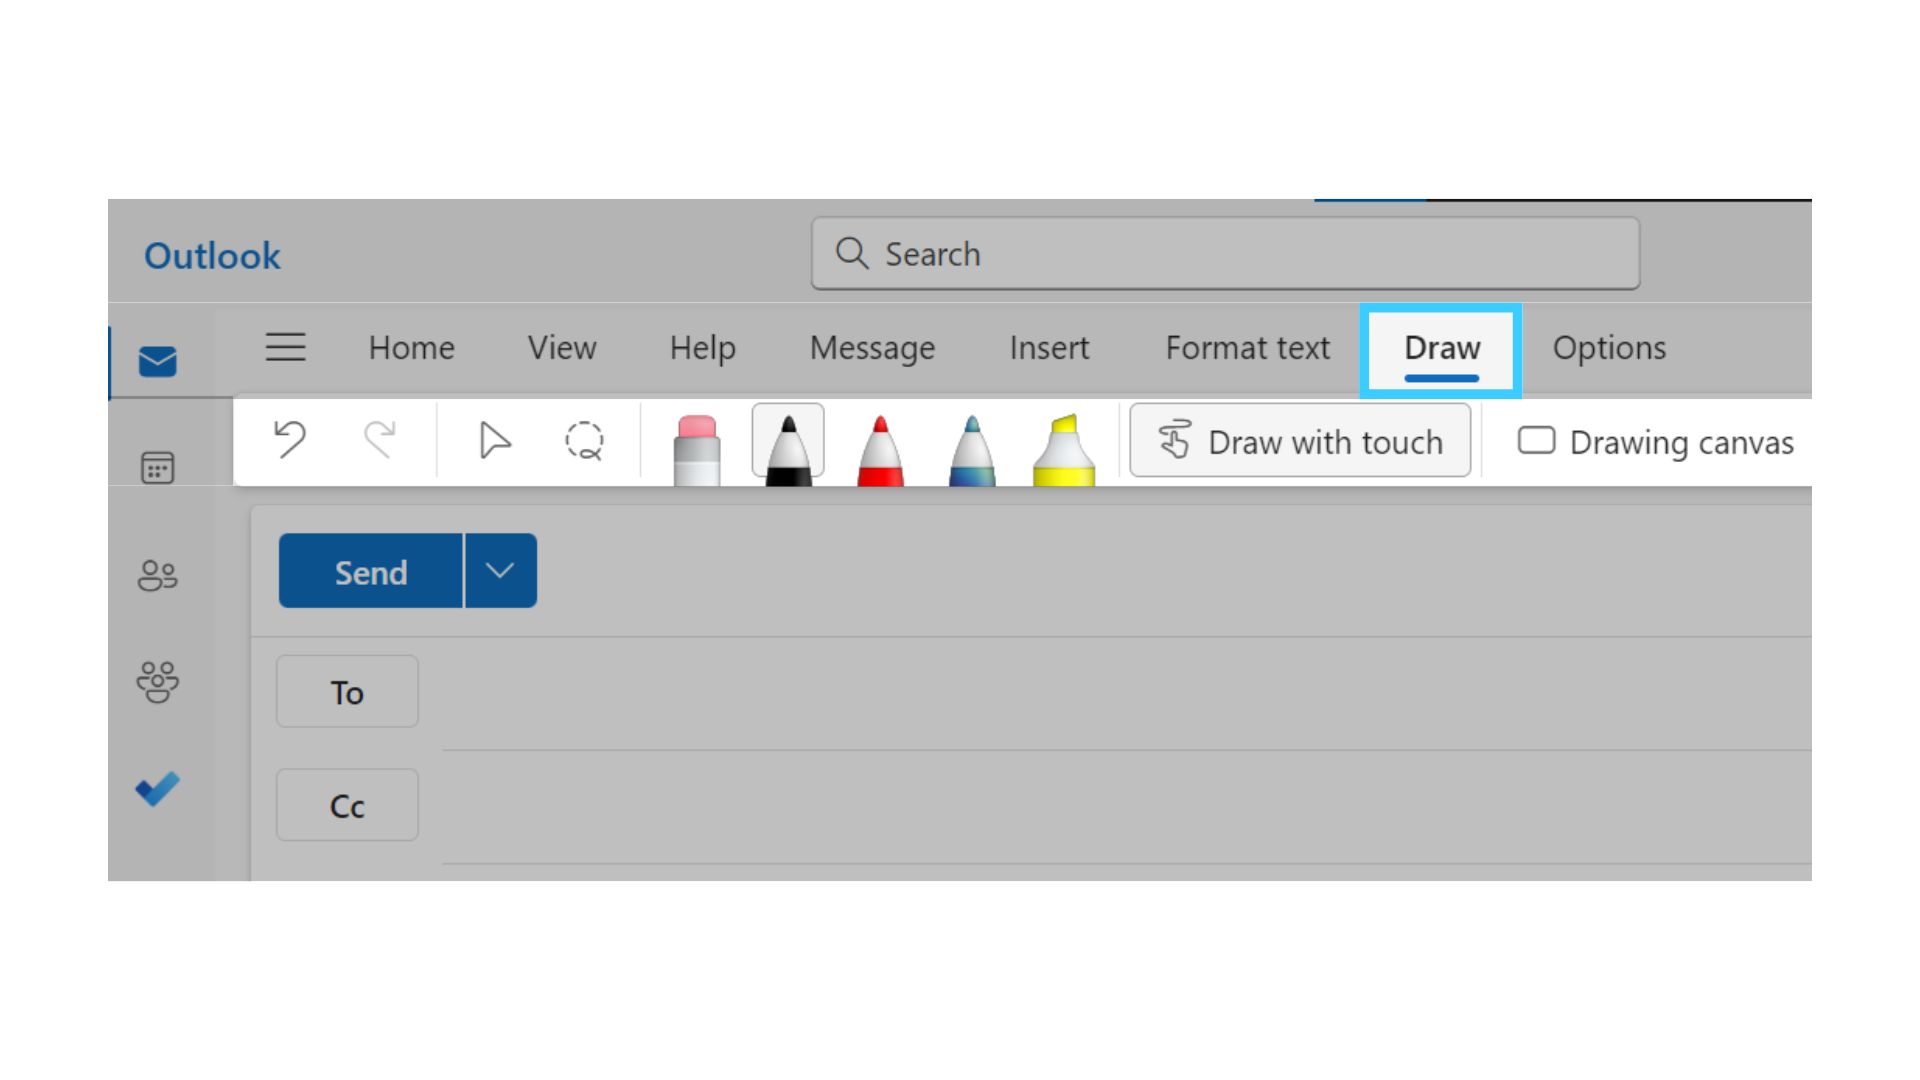
- In the body of the message, click the Drawing Canvas icon.
- Then, pick a pen to draw with (the first pen is an eraser).
- You can use the selector to select anything you want to copy or delete in the canvas.
- Alternatively, you can click the eraser to erase the selected content and the highlighter to highlight the selected content.
- Besides, you can type any message in the message body outside the canvas.
- To turn off the drawing mode, press the Esc key to go back into selection mode.
4. Integration with Viva Engage
Viva Engage brings leaders, coworkers, and communities together to share their thoughts, ideas, or updates across storylines. They can follow their leaders and other people in their organization to stay updated with their storylines and click through to the home feed to see what else they share. They can also start a discussion, question, praise or poll, and share it across their storylines or communities. The main benefit of this integration is that people can focus on emails while collaborating with colleagues, managers, and communities effortlessly from the New Microsoft Outlook inbox.
Steps to Activate Viva Engage
- Click the Apps button from the Navigation Pane on the left edge.
- Select Viva Engage from the list of apps shown.
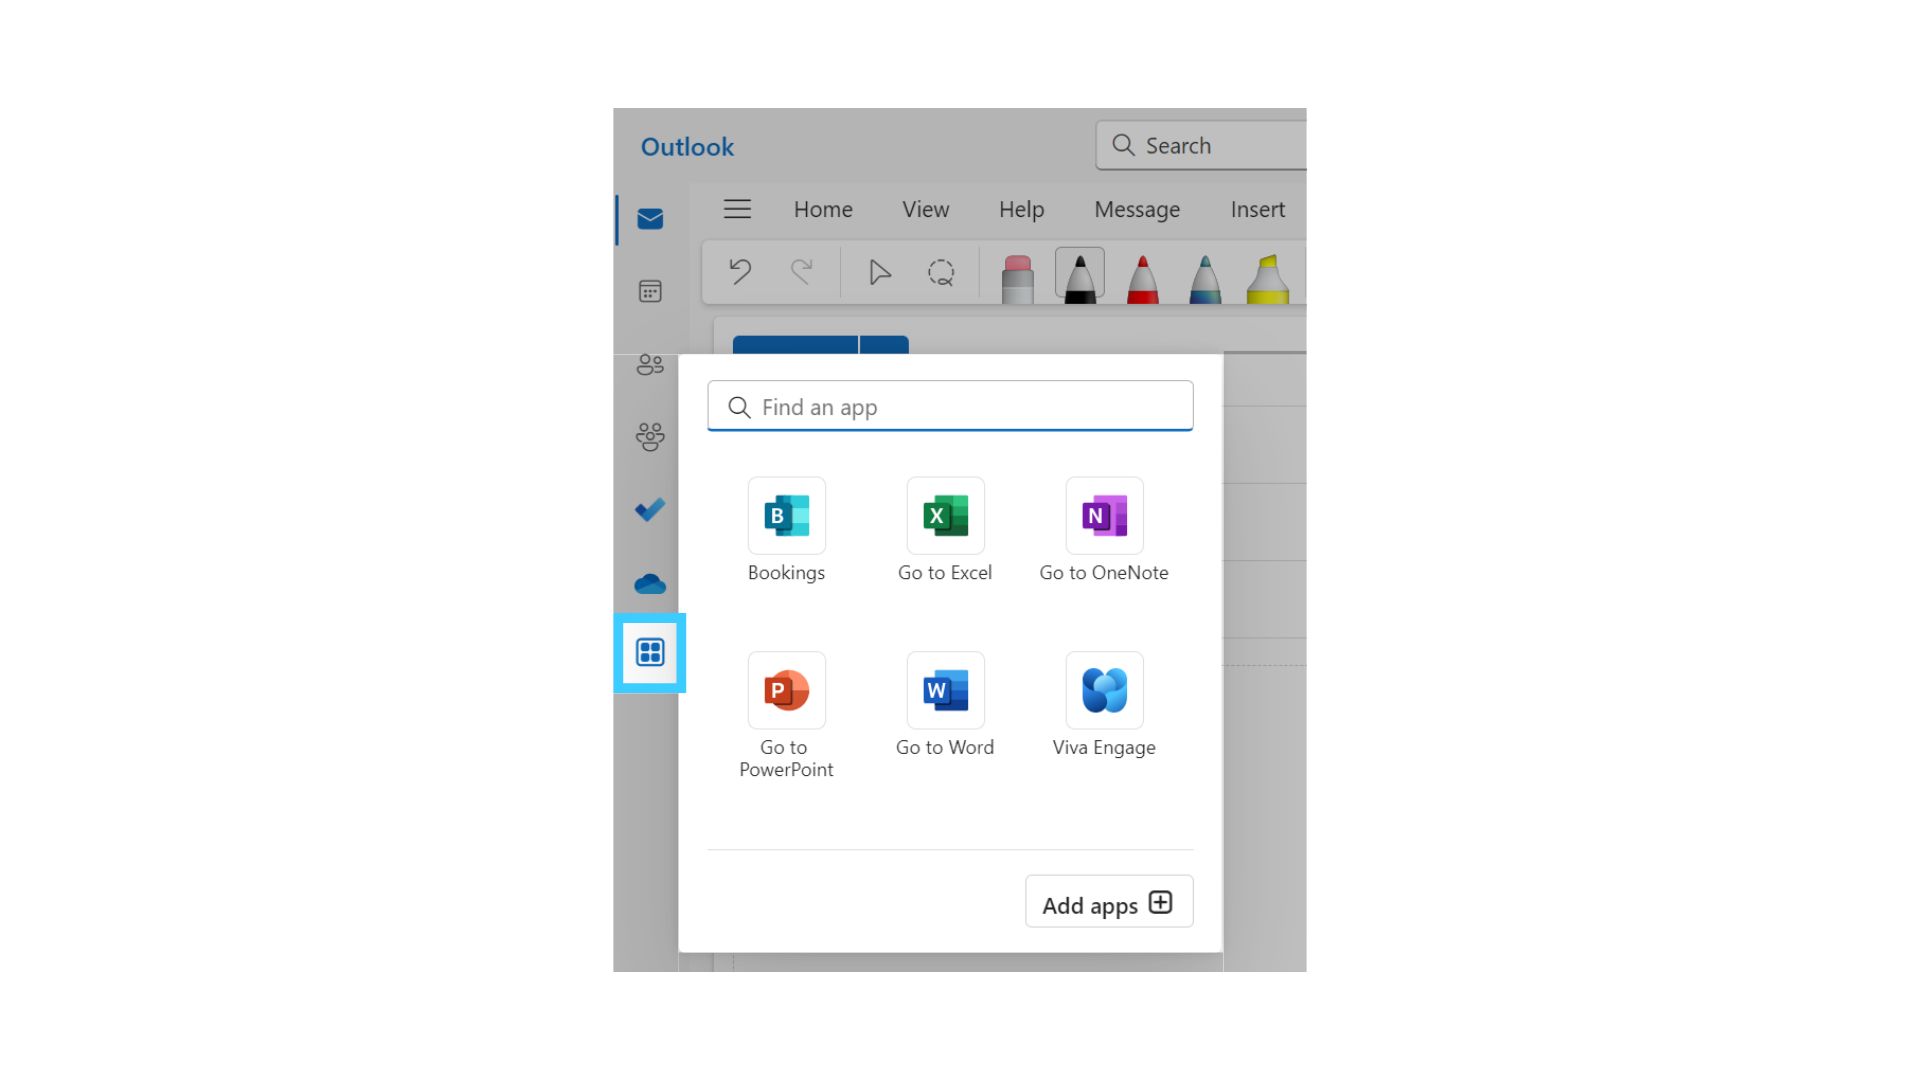
- If Viva Engage doesn’t appear in the list, click the Add apps button and search Viva Engage.
5. Viva Insights Add-in
The Viva Insights Add-in is an extension of the new Microsoft Outlook experience. This extension helps the users to gain focus time, prepare for their meetings, plan time away from work, maintain healthy work relationships, catch up on documents, strike the perfect work-life balance, and much more.
Once the users tap the Viva Insights add-in button, they can notice several cards in the right (Viva Insights) pane. These cards offer several suggestions to help them focus and work efficiently. Here are a few cards for instance.
- Set up your quiet time: Help protect your quiet time from work-related notifications
- Add important people: Remind tasks and unread emails for your important people
- Prepare for your meetings: Make sure you are ready for your upcoming meetings
- Set lunch hours: Personalize your recommendations, for instance, set lunch hours and add a recurring calendar event to protect this time.
- Plan your time away: Update your calendar and notify collaborators of upcoming time away from work
Steps to Activate Viva Insights Add-in
- Open an email message.
- Tap the ellipsis (...) in the top-right corner of your email message, and then select Apps.
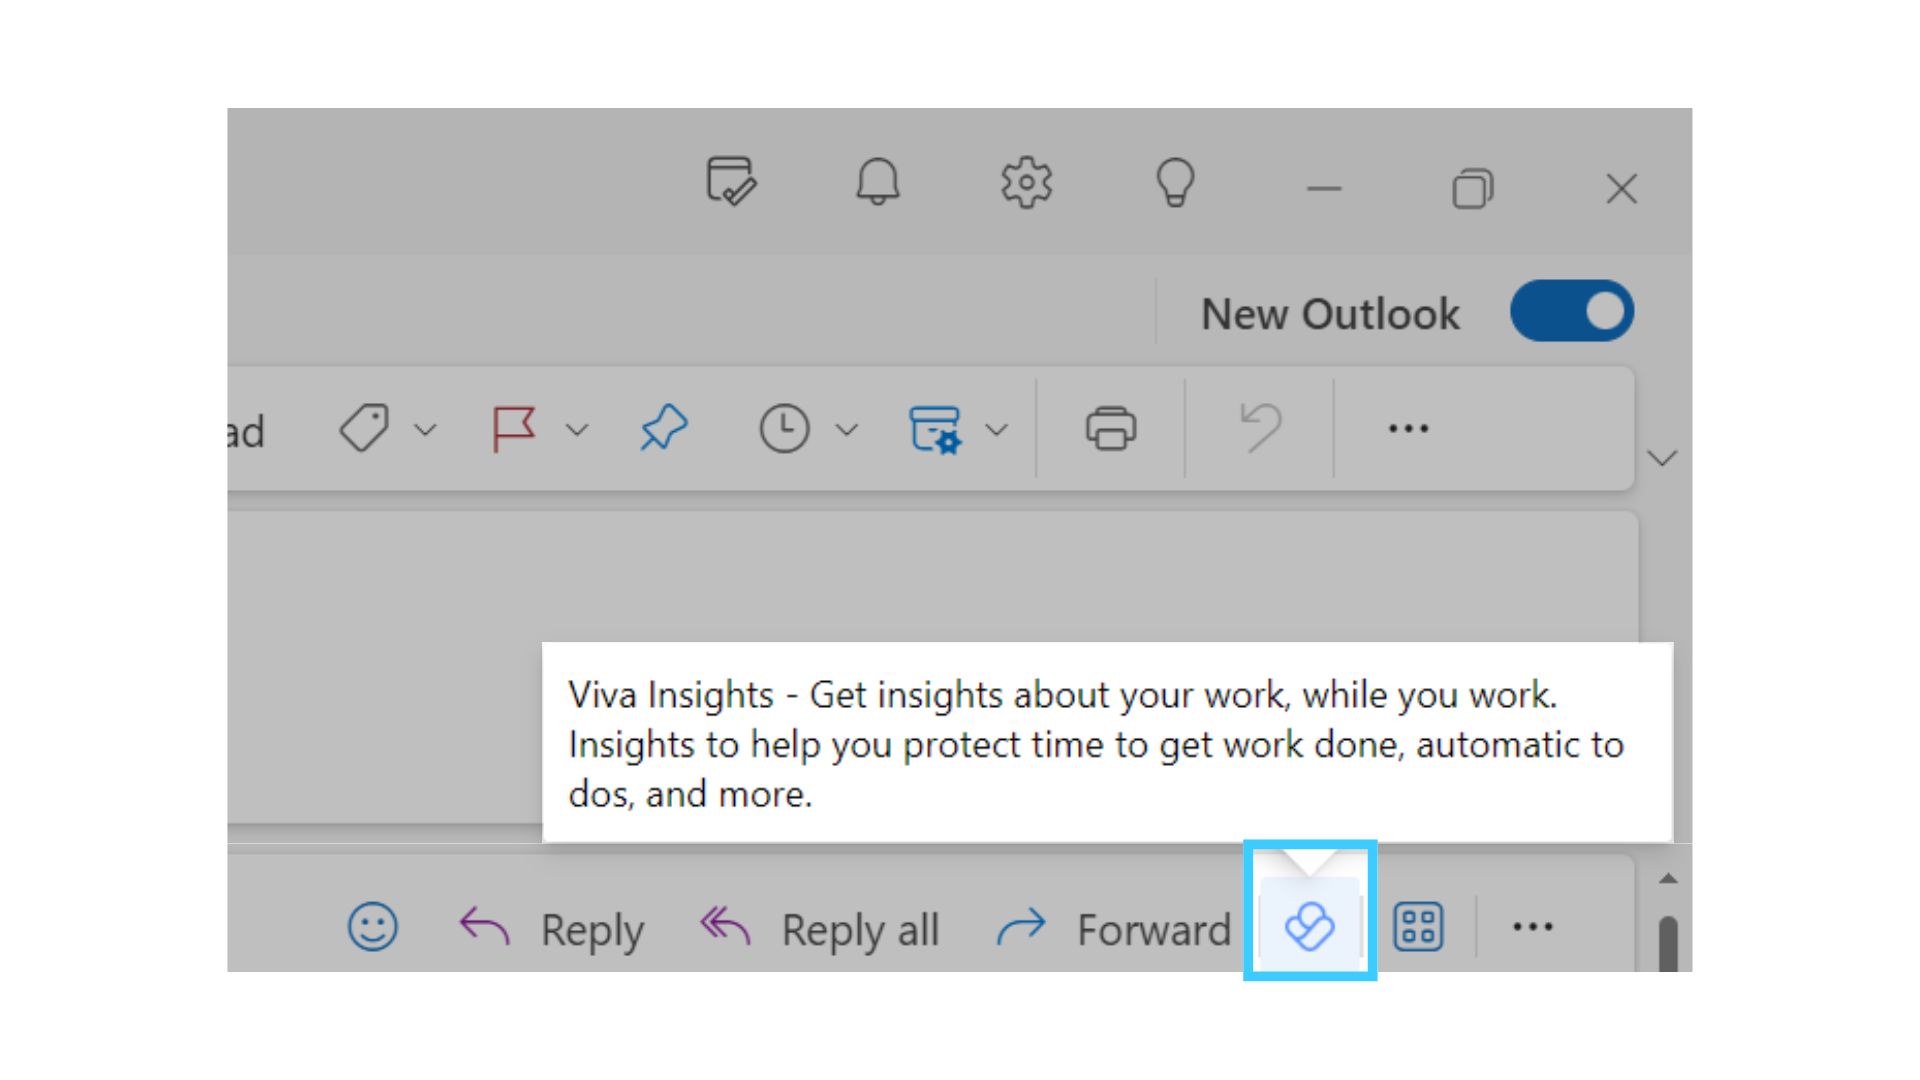
- Select Viva Insights from the list
- You can pin the add-in to your quick-access pane.
6. Recall Message and Undo Send
Recall Message is a feature that will delete the message from mailboxes of all the recipients of the user after sending it. This feature will be available only after the user selects Send and only if the user and their recipient(s) have a Microsoft 365 or Exchange email account in the same organization. Messages sent from a Hotmail, Gmail, or live.com accounts cannot be recalled.
Steps to Activate Recall message
- Select Sent Items folder in the left folder pane.
- Select or double-click the sent message.
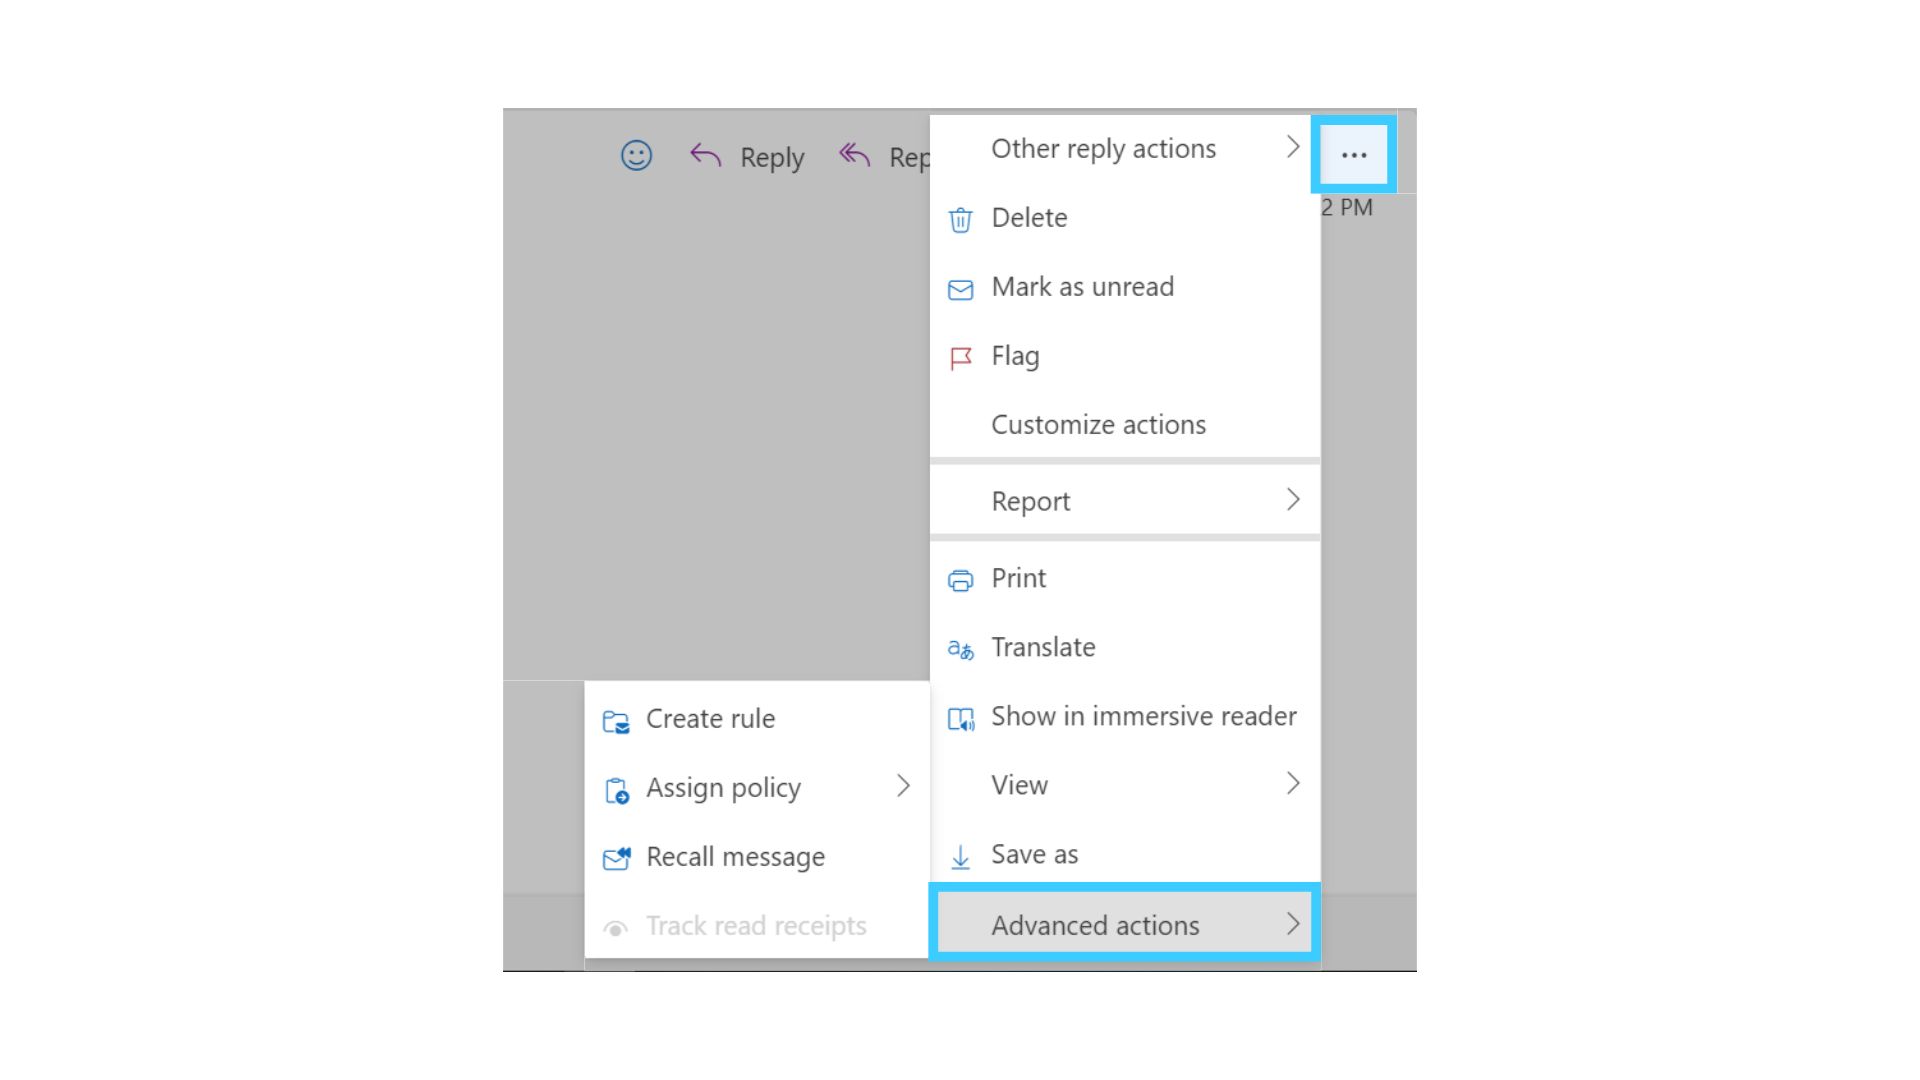
- Tap the ellipsis (...) in the top-right corner of your email message.
- Go to Advanced actions, select Recall message, and then OK in the confirmation dialog box.
- Once your message is recalled, you will receive a Message Recall Report in your inbox.
- Click the link in that message to check if your recall has succeeded, is still pending, or failed.
The New Microsoft Outlook lets the user cancel an email message even after selecting Send. When the Undo send option is enabled, Outlook will wait for a few seconds (up to 10 seconds) before sending emails. If the user doesn’t click the Undo button in time, Outlook will send the email out as usual. The user can’t undo sending an email if it is already sent.
Steps to Activate Undo send
- Go to Settings > Mail > Compose and reply > Undo send
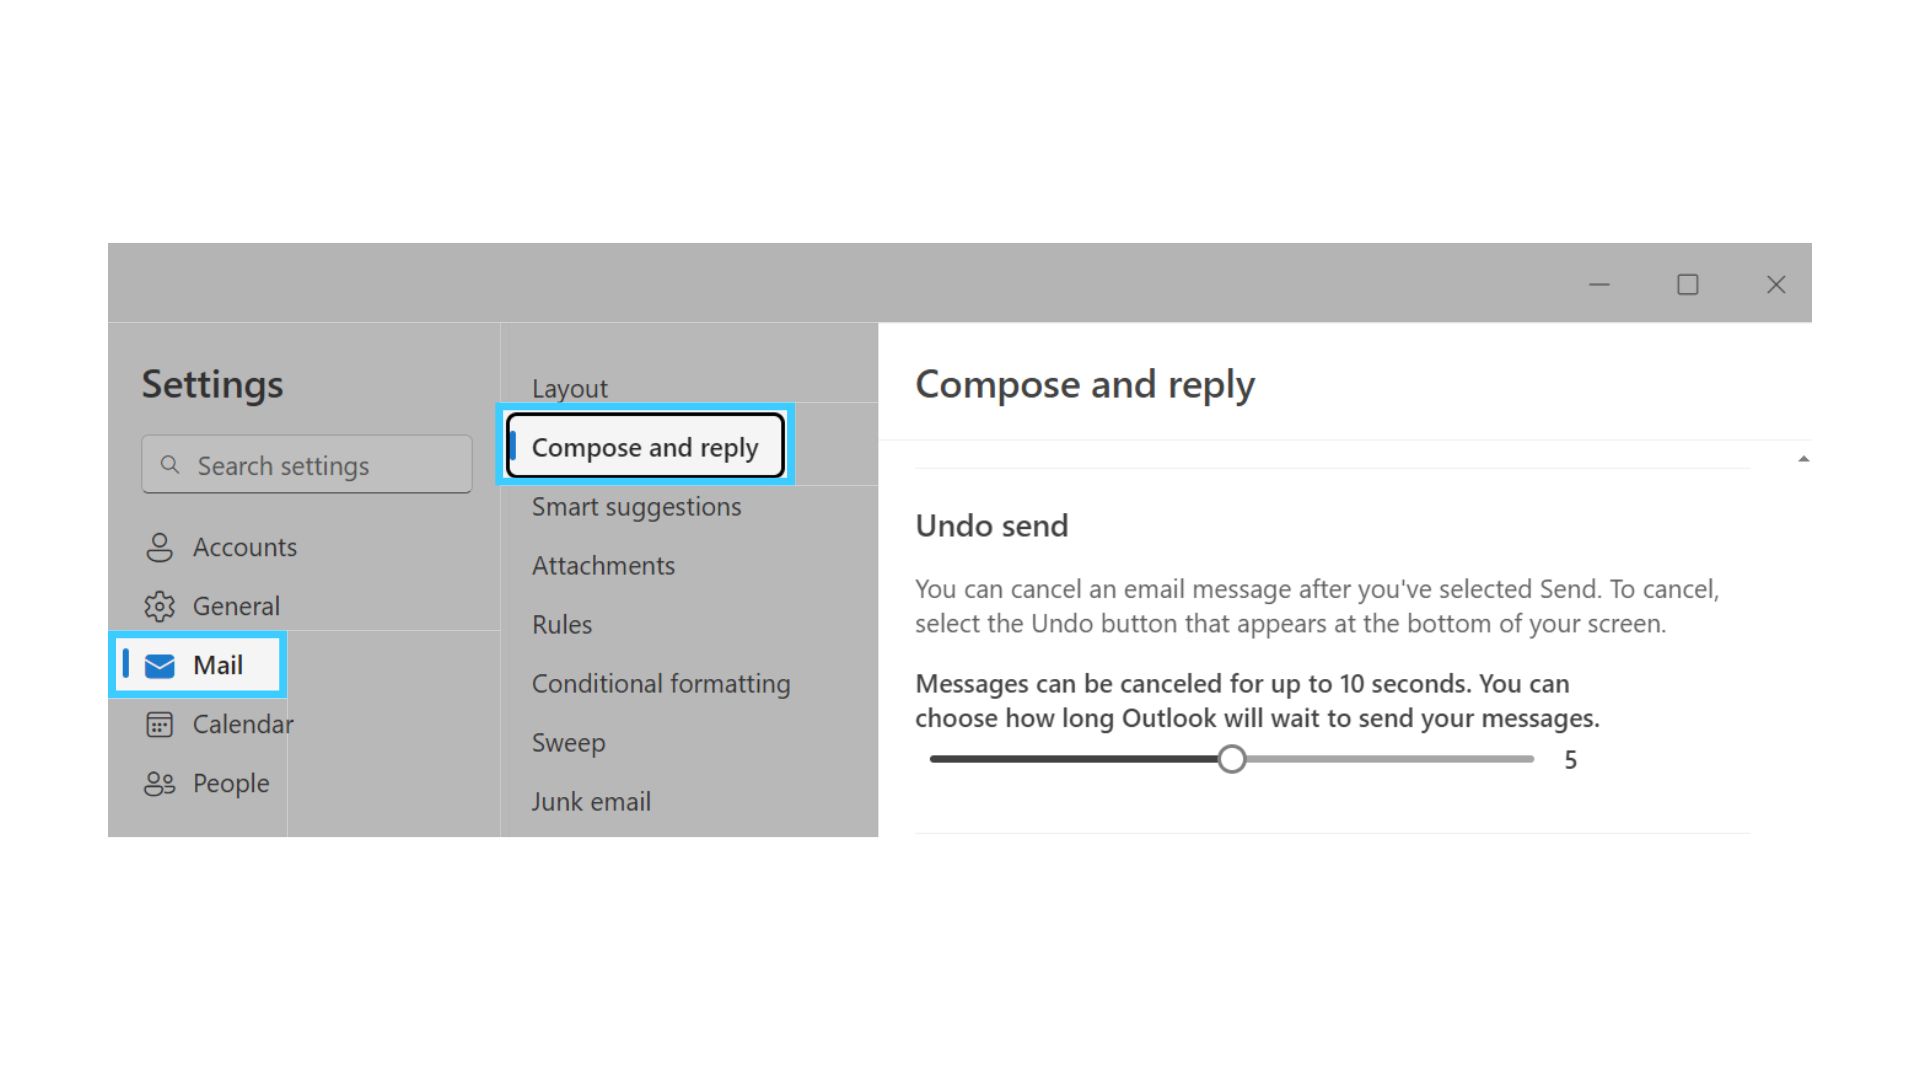
- Messages can be canceled for up to 10 seconds. You can choose how long Outlook must wait to send your messages.
- Once the Undo send feature is activated, you can select the Undo button that will appear at the bottom of your screen after you send the message to undo sending it.
7. Show Declined Events on the Calendar
Through this feature, the users can retain the events that they have declined on their calendar, improving their calendaring experience and time management. This helps in easily recollecting all the essential information regarding the declined event including important information or documents, associated chats, or updating the previous response and forwarding to someone else. Also, the most obvious benefit is that their calendar becomes free for that slot!
Steps to Activate ‘Show Declined Events’ feature
- By default, the ability to preserve declined events will be disabled.
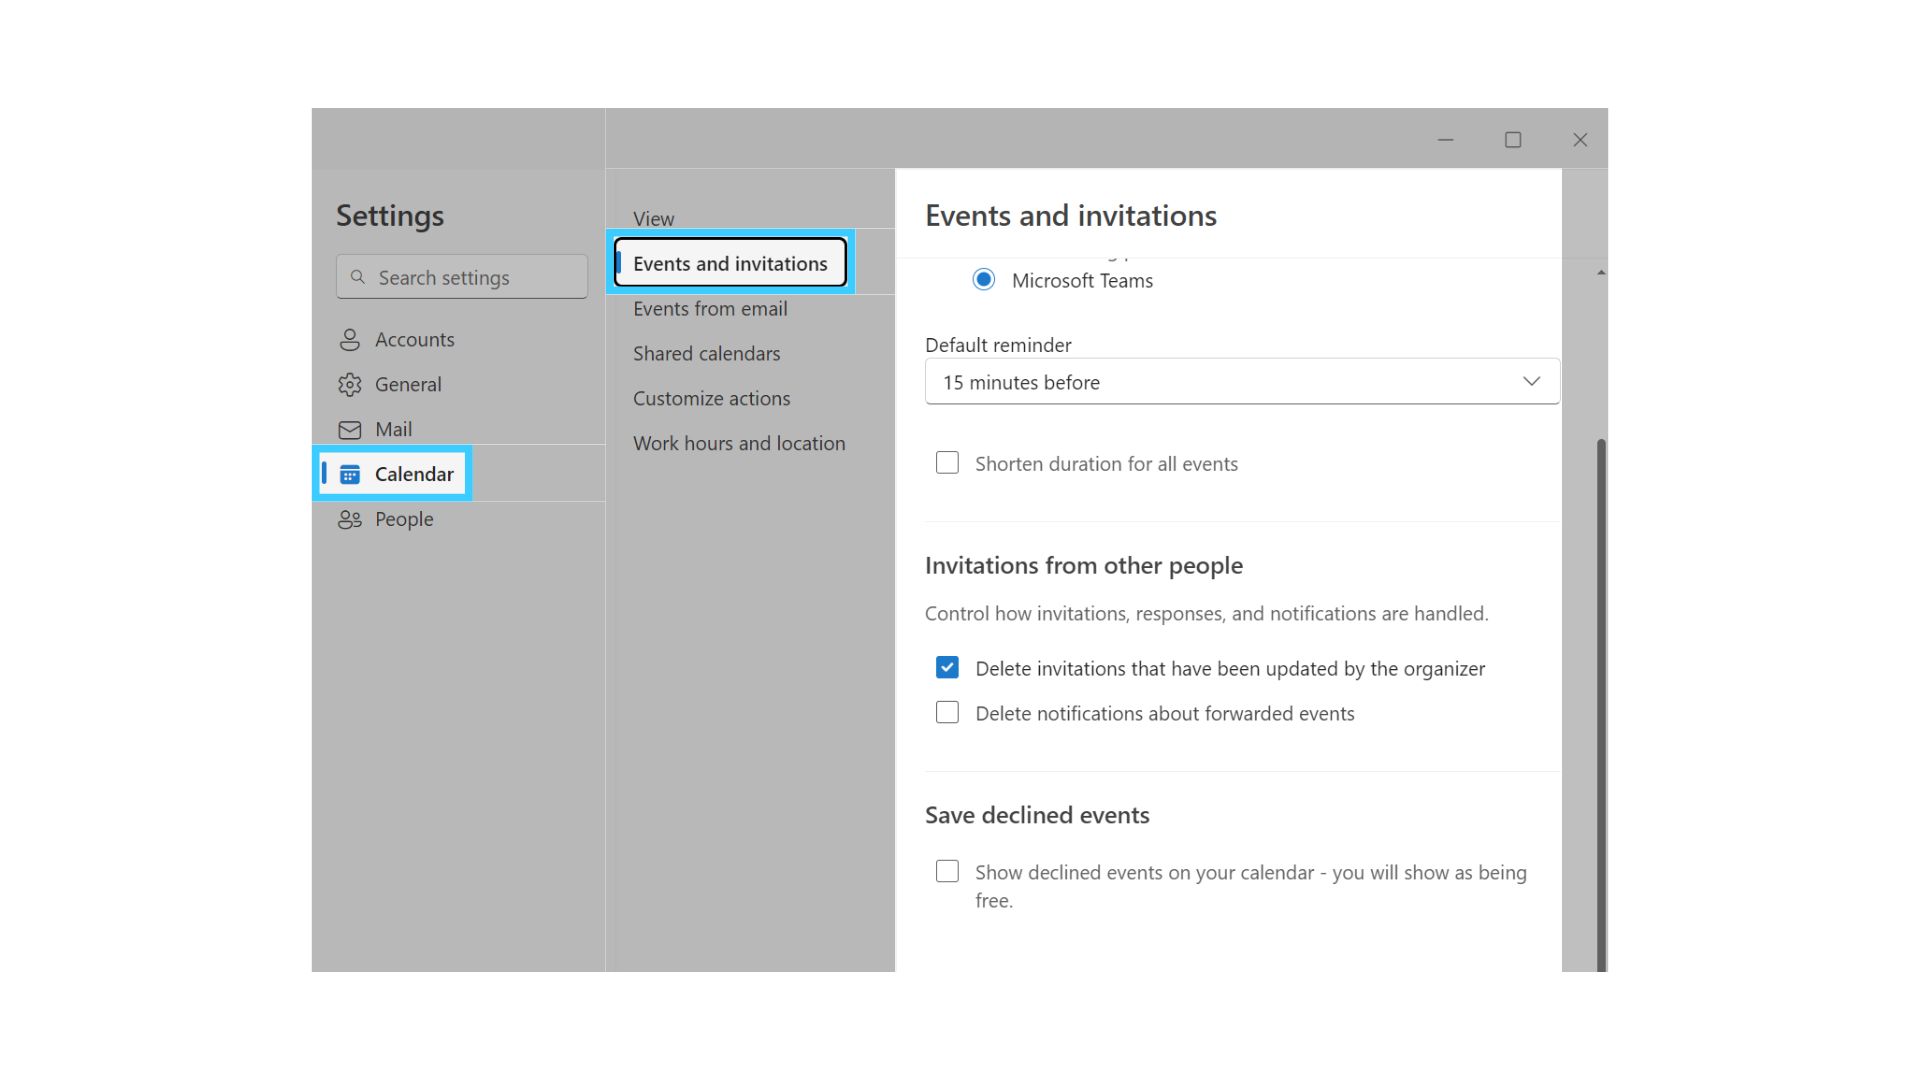
- To activate this feature in Outlook, go to Settings > Calendar > Events and invitations > Save declined events.
- Post this, information regarding all the declined events or meeting invites will be preserved.
8. Conditional Formatting
The Conditional Formatting feature helps in customizing the email view by highlighting important messages based on specific criteria. When the users specify a certain condition(s) that an incoming message must meet, such as a sender’s name or email address, the conditional formatting gets applied only to those messages. These conditional formatting rules will be set on both read and unread messages and are applied across all folders except Drafts. These rules can also be adapted and changed as needed.
Steps to Activate Conditional Formatting
- Go to Settings > Mail > Conditional Formatting.
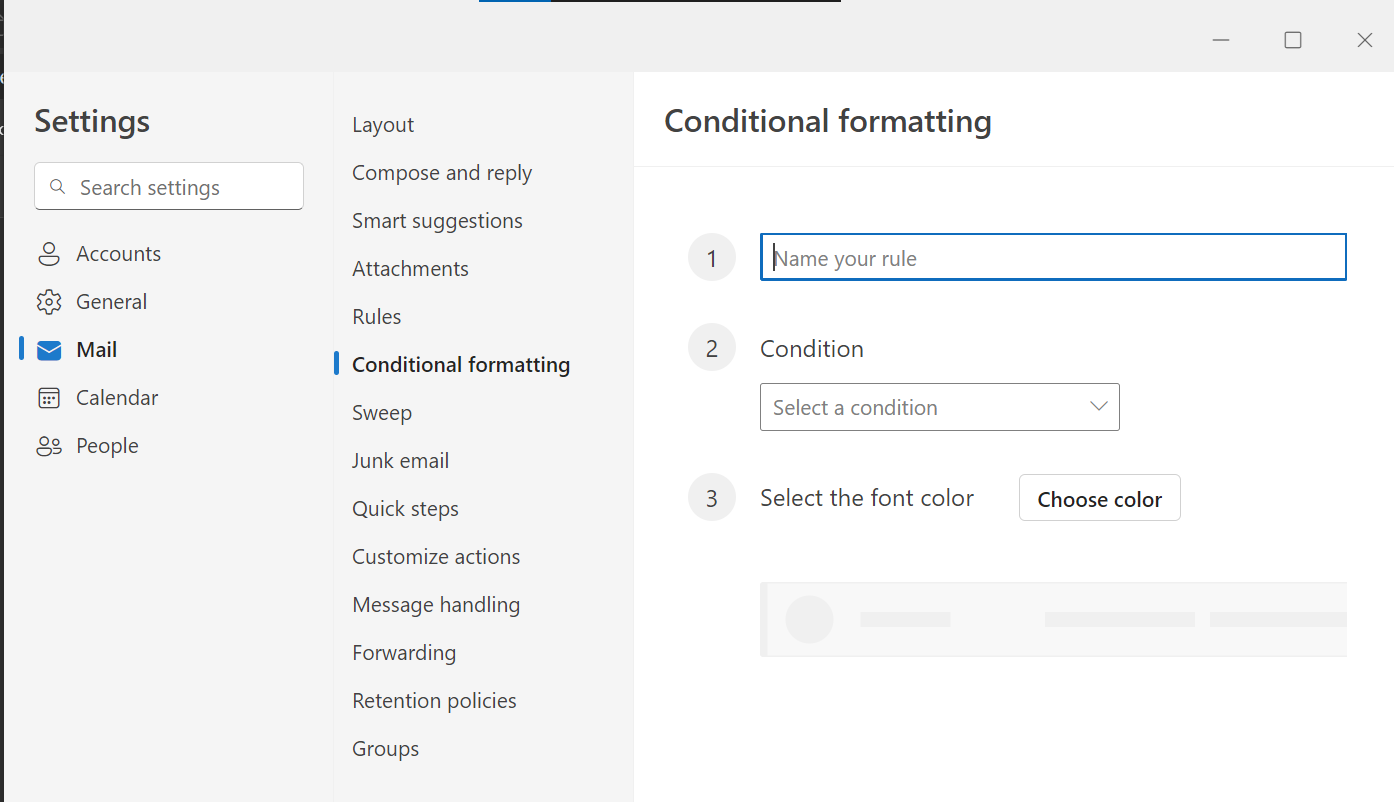
- Click the Create new conditional formatting rule tab.
- Name your new rule, for instance, Manager’s Emails.
- Specify your condition(s) for instance, choose ‘From’ in the ‘Select a condition’ dropdown and add your Manager’s email in the ‘Please add a sender’ tab.
- Select the font color for the message list to display. Under Preview, you can view an example of how the text will appear.
- When you're satisfied with your selection, click OK.
- Click Save to save the changes or Discard to discard the changes.
- Click the Edit button to edit the conditional formatting rule or the Delete button to delete it.
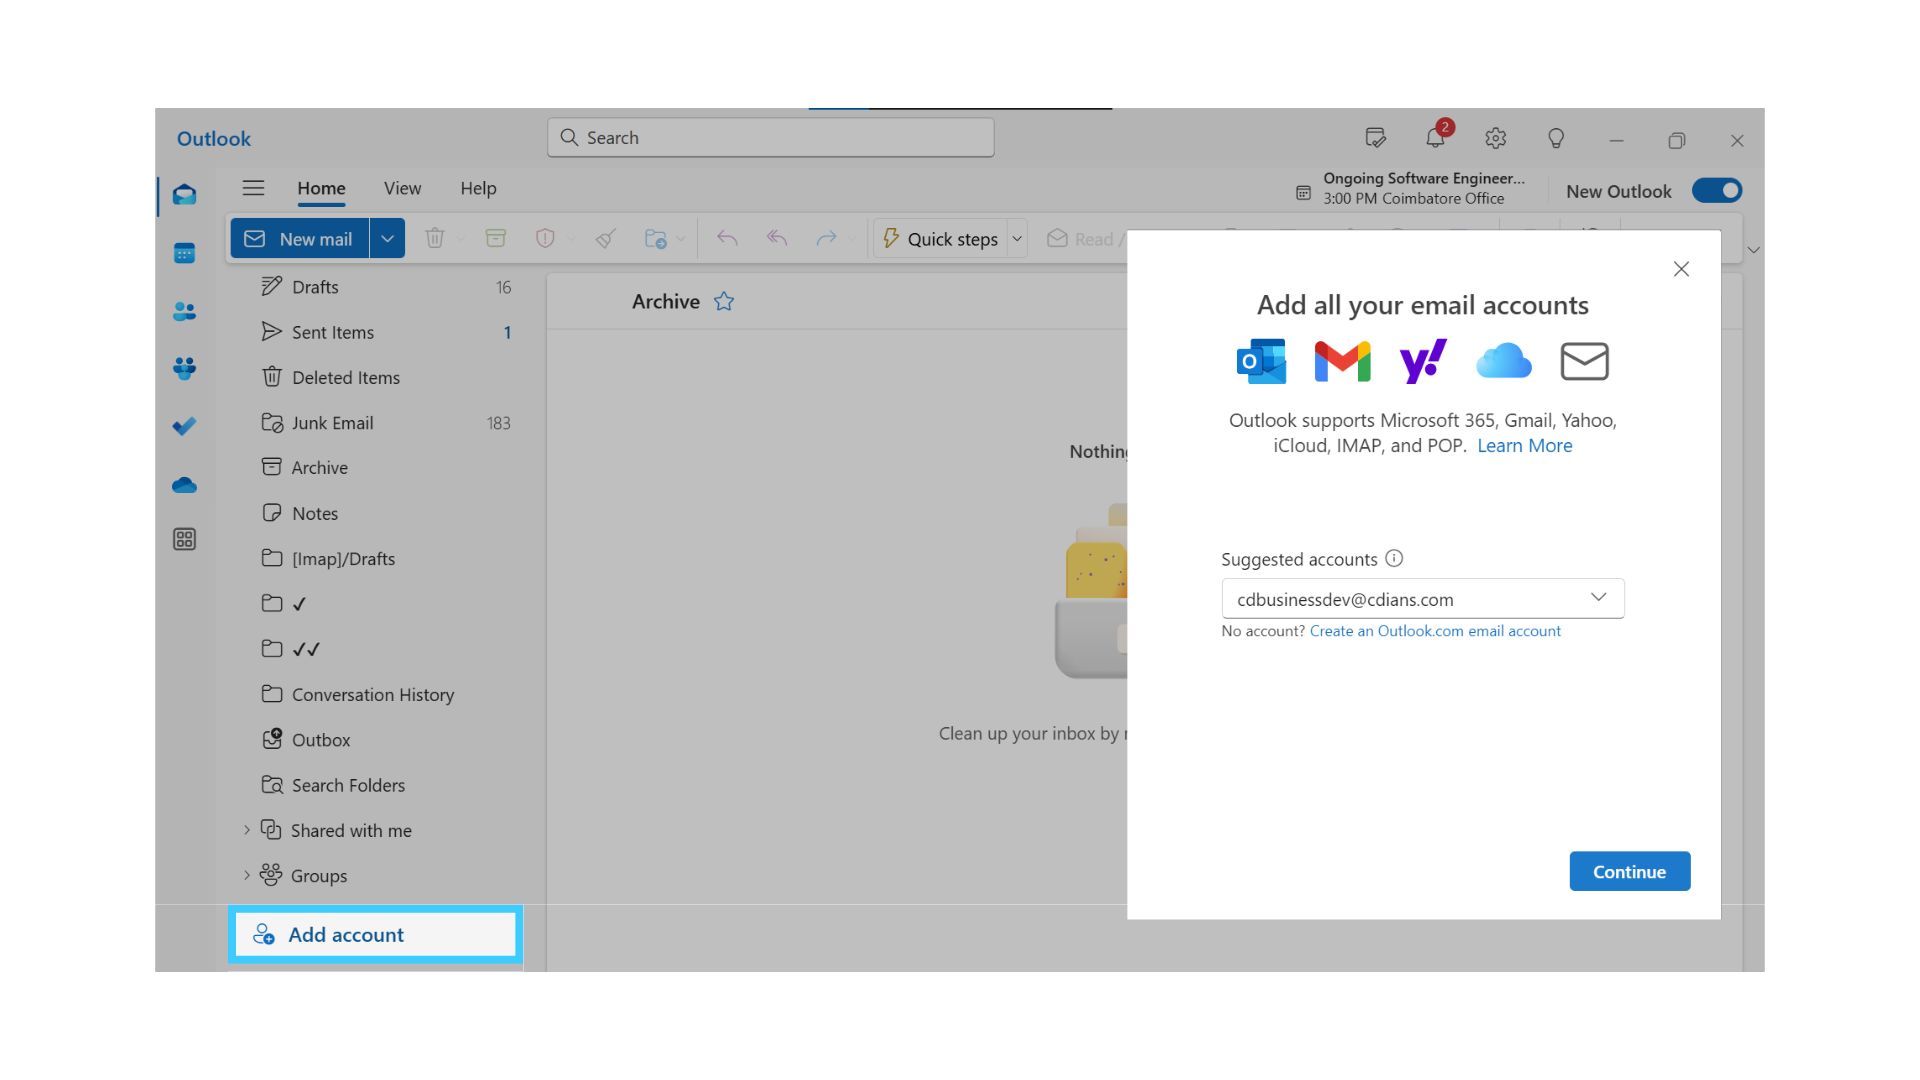
9. Support Third-Party Email Accounts (Gmail, Yahoo, iCloud, and IMAP)
Users can add a third-party email account - Gmail, Yahoo, iCloud, and IMAP in the new Outlook for Windows in just a few clicks. This helps users in accessing all their emails at one spot on any Windows 10 or 11 device, thus eliminating the need to switch to different apps on websites to access emails and saving time and effort. Unlike the classic Outlook experience, users can use their Gmail email, and Google Calendar and Contacts within the new Outlook for Windows.
Steps to Add a Third-Party Email
- To add a third-party email to your Outlook account, click the Add account button at the bottom of the folder pane. (Or)
- Go to Accounts > Email accounts > Settings, select Add Account, select a suggested account from the dropdown menu or enter a different email address, and click Continue.
- Enter your password for the account and select Done.
- To delete or manage an account, find the respective account in the Email accounts section and then click Manage.
- Select Remove or Set as primary account under Account details and click Return to the accounts page or close the Settings window.
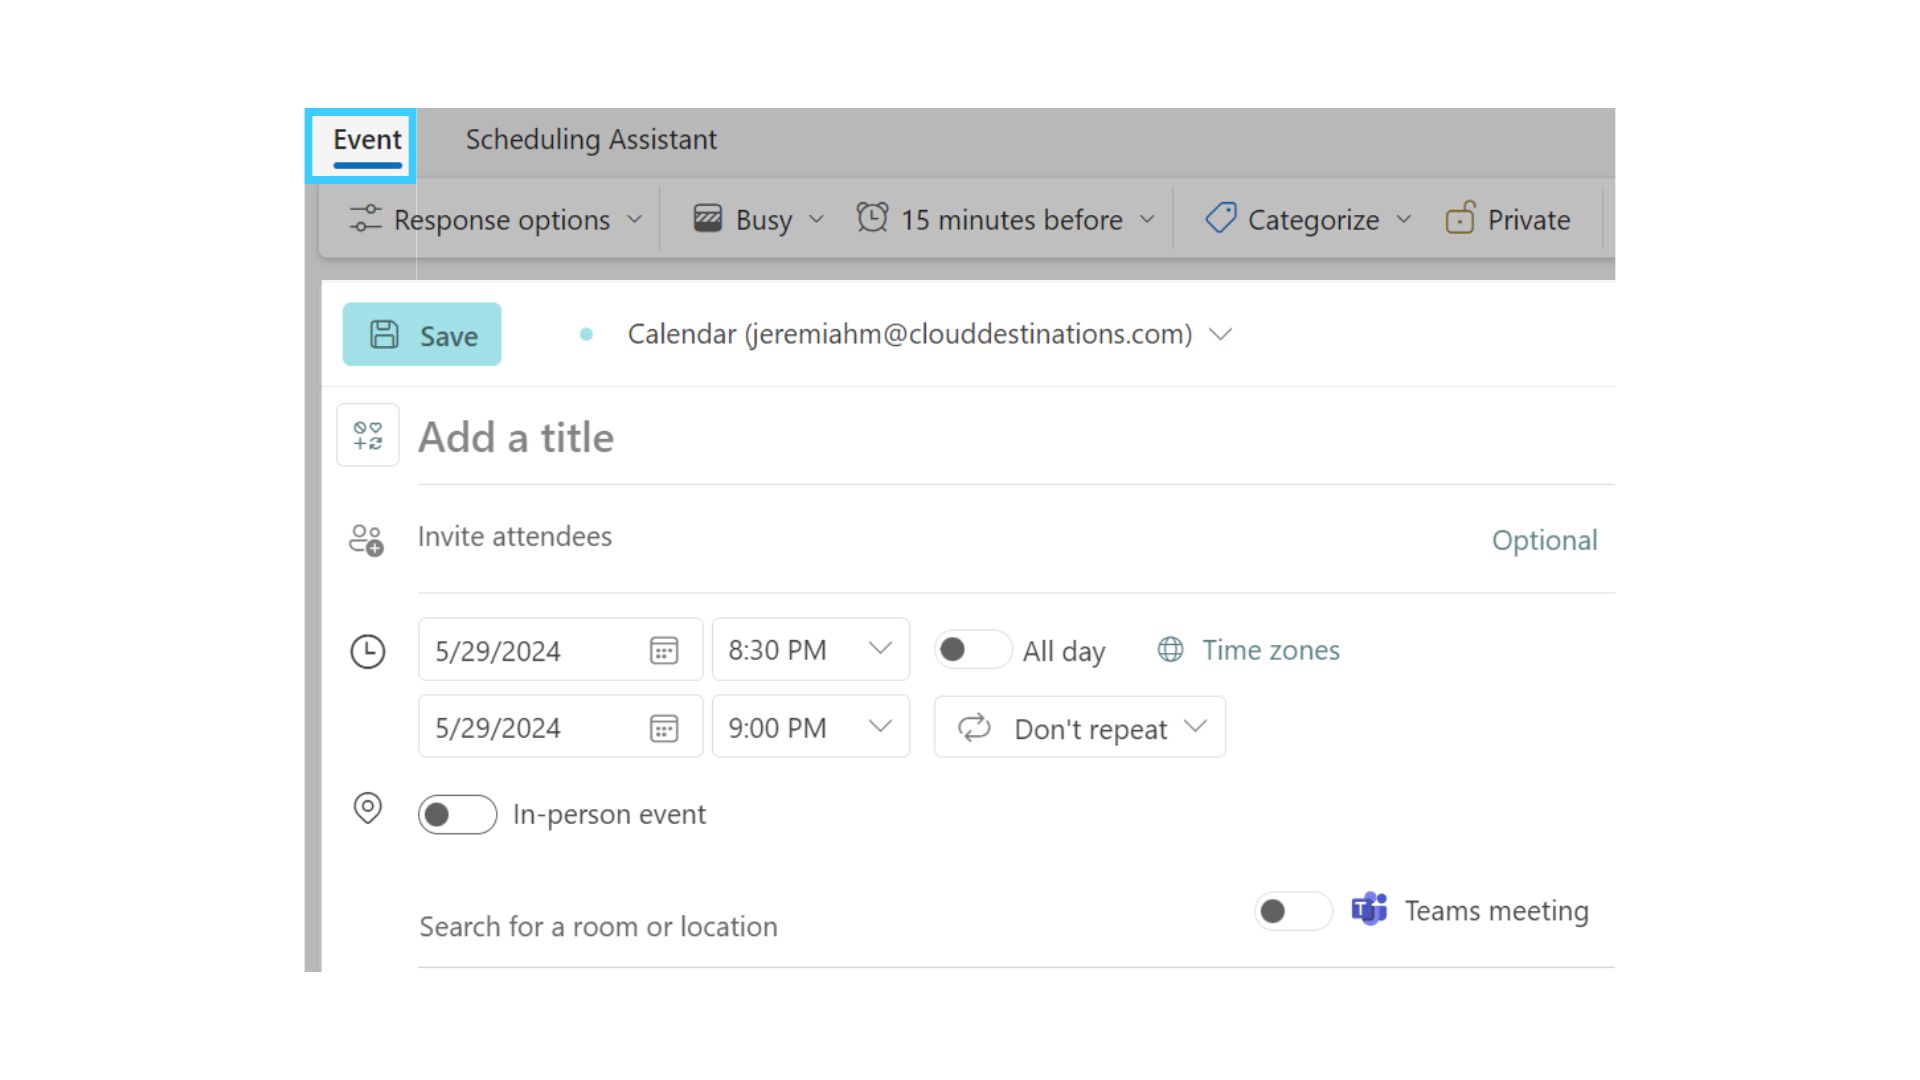
10. Improved Hybrid Meeting Experience
Through this feature, the meeting organizers can request in-person attendance for a meeting and attendees can RSVP confirming if they can participate in person or virtually. While RSVPing, users can see three options - ‘Yes, in-person', ‘Yes, virtually’, or ‘Yes’. This improved hybrid meeting experience also allows members to attend the meeting over Teams if they cannot make it to the office. Moreover, the meeting organizers can track responses in the tracking pane, which displays each person’s attendance preference along with their response.
Steps to Activate In-Person Attendance in a Meeting
- Create or open the meeting that you want to set as in-person.
- Select the In-Person event toggle next to the Location field.
- When a meeting is marked as in-person, the suggested times for the event might change not only based on the attendees’ time availability, but also their location availability. Time slots in which the attendees will be present in the office will be suggested first.
- All meetings that are marked as in-person will have visual cues like [in-person] suffix on both the email invite and the calendar event regarding the same.
Tailor Outlook to your Style!
The New Microsoft Outlook for Windows has something for everyone to tailor according to their style. Users can relish the best of Outlook’s features for free with no need for any subscription. Besides the above features, users can refer to a list of tips by clicking the bulb icon in the top rightmost corner of the New Microsoft Outlook. The tips are segregated into categories such as Get Started, Personalization, Productivity, Accounts, Security, and All.


 Linkedin